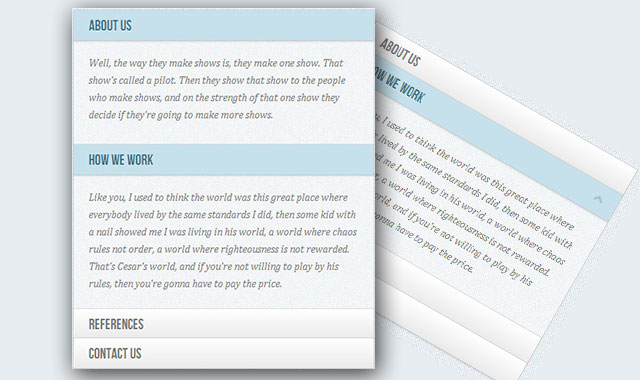
这是一款十分经典的纯css3列表手风琴插件。该插件使用css兄弟选择器和:target伪类来实现。
有很多种方法使用纯css来制作手风琴效果,其中使用最多的是使用:target伪类来实现。使用:target伪类的问题是我们不能够再次关闭内容区域或同时显示多个内容区域。但是通过使用checkbox,我们可以控制内容区域的打开和关闭。如果只想在某一时刻只显示一个内容,可以使用radio按钮来实现。
HTML
下面的例子是使用checkbox来实现手风琴的代码,在下面的结构中,其中一个内容区域默认的打开的(通过checked来设置)。整体结构是通过一个class为ac-container的section来包裹所有的手风琴子项。每个子项包含一个checkbox、一个label和内容区域的内容:
<section class="ac-container">
    <div>
        <input id="ac-1" name="accordion-1" type="checkbox" />
        <label for="ac-1">About us</label>
        <article class="ac-small">
            <p>Some content... </p>
        </article>
    </div>
    <div>
        <input id="ac-2" name="accordion-1" type="checkbox" checked />
        <label for="ac-2">How we work</label>
        <article class="ac-medium">
            <p>Some content... </p>
        </article>
    </div>
    <div><!--...--></div>
</section>
需要注意的是给每一个input一个id,以便使其与label通过for联系起来。这样在点击label时就相当于点击了checkbox。
CSS
首先给手风琴定义一个宽度并让它居中:
.ac-container{
    width: 400px;
    margin: 10px auto 30px auto;
}
接下来给Label一些渐变,将它们做成按钮的样式。同时给它们一些阴影效果,和设置z-index为20,保证它们在其他元素的上面。
左侧菜单的结构如下:
.ac-container label{
    font-family: 'BebasNeueRegular', 'Arial Narrow', Arial, sans-serif;
    padding: 5px 20px;
    position: relative;
    z-index: 20;
    display: block;
    height: 30px;
    cursor: pointer;
    color: #777;
    text-shadow: 1px 1px 1px rgba(255,255,255,0.8);
    line-height: 33px;
    font-size: 19px;
    background: linear-gradient(top, #ffffff 1%,#eaeaea 100%);
    box-shadow:
        0px 0px 0px 1px rgba(155,155,155,0.3),
        1px 0px 0px 0px rgba(255,255,255,0.9) inset,
        0px 2px 2px rgba(0,0,0,0.1);
}
当鼠标滑过的时候,设置Label的背景颜色为白色:
.ac-container label:hover{
    background: #fff;
}
当我们点击了label时,实际上是点击了checkbox,这时,我们希望每一个label都有下面的“selected”样式:
.ac-container input:checked + label,
.ac-container input:checked + label:hover{
    background: #c6e1ec;
    color: #3d7489;
    text-shadow: 0px 1px 1px rgba(255,255,255, 0.6);
    box-shadow:
        0px 0px 0px 1px rgba(155,155,155,0.3),
        0px 2px 2px rgba(0,0,0,0.1);
}
这里可以看到,我们使用兄弟选择器来选择label
为hover状态的label添加一个图标,这里简单的使用after伪元素来制作:
.ac-container label:hover:after,
.ac-container input:checked + label:hover:after{
    content: '';
    position: absolute;
    width: 24px;
    height: 24px;
    right: 13px;
    top: 7px;
    background: transparent url(../images/arrow_down.png) no-repeat center center;
}
对于已经被选择的子项,其图标应该是“向上箭头”。
.ac-container input:checked + label:hover:after{
    background-image: url(../images/arrow_up.png);
}
隐藏所有的input表单:
.ac-container input{
    display: none;
}
内容区域的高度开始时设置为0,并且设置overflow为hidden。然后为内容区的高度和它的阴影设置一个transition。这个transtion将在关闭内容区域时产生作用。还要为已被选择的子项添加transition。正如demo中的效果,关闭的速度要比打开的速度稍快一些。
.ac-container article{
    background: rgba(255, 255, 255, 0.5);
    margin-top: -1px;
    overflow: hidden;
    height: 0px;
    position: relative;
    z-index: 10;
    transition:
        height 0.3s ease-in-out,
        box-shadow 0.6s linear;
}
.ac-container input:checked ~ article{
    transition:
        height 0.5s ease-in-out,
        box-shadow 0.1s linear;
    box-shadow: 0px 0px 0px 1px rgba(155,155,155,0.3);
}
给内容区域添加一些样式:
.ac-container article p{
    font-style: italic;
    color: #777;
    line-height: 23px;
    font-size: 14px;
    padding: 20px;
    text-shadow: 1px 1px 1px rgba(255,255,255,0.8);
}
现在为不同的内容区域定义三个不同的class,这些高度将用于产生过渡动画。
.ac-container input:checked + label,
.ac-container input:checked + label:hover{
    background: #c6e1ec;
    color: #3d7489;
    text-shadow: 0px 1px 1px rgba(255,255,255, 0.6);
    box-shadow:
        0px 0px 0px 1px rgba(155,155,155,0.3),
        0px 2px 2px rgba(0,0,0,0.1);
}
正如前面所说,“auto”高度是最好的选择,但是这里我们不能使用自动高度来产生动画,所以必须为其设置一个高度。
请注意,某些手机浏览器在点击label时可能不能触发checkbox的事件。

