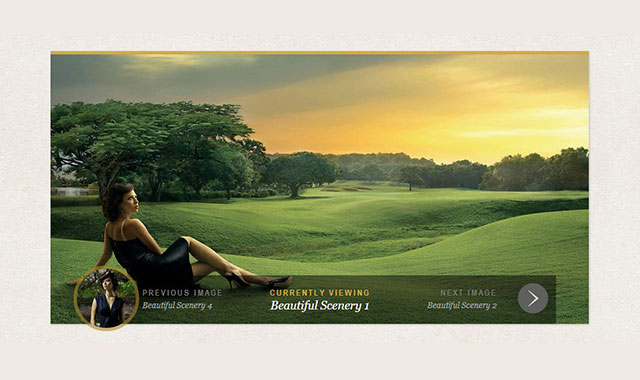
这个jQuery和css3圆形缩略图导航轮播图插件的亮点在于鼠标滑过导航箭头时出现的圆形缩略图效果。该效果使用css3 transitions来完成。
HTML
html结构采用标准的导航按钮结构:
<div class="cn-nav">
    <a href="#" class="cn-nav-prev">
        <span>Previous</span>
        <div style="background-image:url(../images/thumbs/1.jpg);"></div>
    </a>
    <a href="#" class="cn-nav-next">
        <span>Next</span>
        <div style="background-image:url(../images/thumbs/3.jpg);"></div>
    </a>
</div>
CSS
设置元素为绝对定位,为了是鼠标滑过区域不至于太小,设置超链接的宽度和高度为70像素:
.cn-nav > a{
    position: absolute;
    top: 0px;
    height: 70px;
    width: 70px;
}
a.cn-nav-prev{
    left: 0px;
}
a.cn-nav-next{
    right: 0px;
}
用于显示前后导航的箭头span<初始化时给它46像素的宽和高,为了使它看起来是个圆形,需要设置它的border radius为宽和高的一半。通过设置-50%的margin,将它放置到超链接元素的中间位置。然后为它的所有属性设置transition:
.cn-nav a span{
    width: 46px;
    height: 46px;
    display: block;
    text-indent: -9000px;
    -moz-border-radius: 23px;
    -webkit-border-radius: 23px;
    border-radius: 23px;
    cursor: pointer;
    opacity: 0.9;
    position: absolute;
    top: 50%;
    left: 50%;
    background-size: 17px 25px;
    margin: -23px 0 0 -23px;
    -webkit-transition: all 0.4s ease;
    -moz-transition: all 0.4s ease;
    -o-transition: all 0.4s ease;
    -ms-transition: all 0.4s ease;
    transition: all 0.4s ease;
}
设置左右箭头的背景图像:
.cn-nav a.cn-nav-prev span{
    background: #666 url(../images/prev.png) no-repeat center center;
}
.cn-nav a.cn-nav-next span{
    background: #666 url(../images/next.png) no-repeat center center;
}
作为背景缩略图的div初始化时宽度和高度为0像素,并设置为绝对定位,相对于超链接元素居中。它的Border radius和margins初始化时也为0。背景图片将填充整个div,因此给它的宽和高100%的background-size。最后给它的所有属性transition,动画时间200ms和ease-out动画效果:
.cn-nav a div{
    width: 0px;
    height: 0px;
    position: absolute;
    top: 50%;
    left: 50%;
    overflow: hidden;
    background-size: 100% 100%;
    background-position: center center;
    background-repeat: no-repeat;
    margin: 0px;
    -moz-border-radius: 0px;
    -webkit-border-radius: 0px;
    border-radius: 0px;
    -webkit-transition: all 0.2s ease-out;
    -moz-transition: all 0.2s ease-out;
    -o-transition: all 0.2s ease-out;
    -ms-transition: all 0.2s ease-out;
    transition: all 0.2s ease-out;
}
下面来设置鼠标滑过hover样式。
span元素的宽和高将增长到100像素。同样为它设置负的margin和一半大小的border radius。为背景图片增加一点大小,同时改变背景图片的颜色和透明度:
.cn-nav a:hover span{
    width: 100px;
    height: 100px;
    -moz-border-radius: 50px;
    -webkit-border-radius: 50px;
    border-radius: 50px;
    opacity: 0.6;
    margin: -50px 0 0 -50px;
    background-size: 22px 32px;
    background-color:#a8872d;
}
最后,缩略图div将扩大到90像素,这样我们仍然可以看到span元素环绕着它。我们同样增加一点background size和设置负的margins以及元素一半宽度的border radius:
.cn-nav a:hover div{
    width: 90px;
    height: 90px;
    background-size: 120% 120%;
    margin: -45px 0 0 -45px;
    -moz-border-radius: 45px;
    -webkit-border-radius: 45px;
    border-radius: 45px;
}
js代码请参考下载文件。

