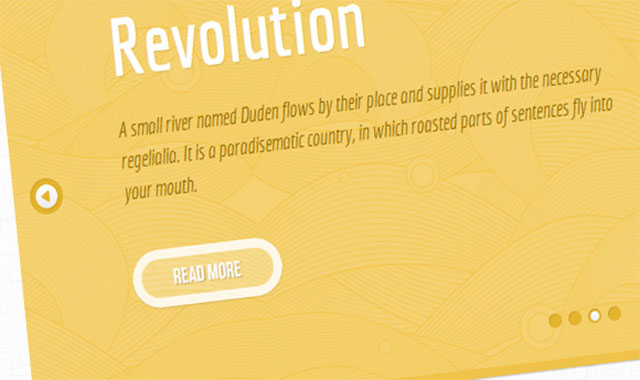

这款插件使用CSS animations来控制幻灯片中的各个动画元素,并使幻灯片的背景产生视觉差效果。
这个效果的灵感来自于Kendo UI主页上的幻灯片效果。
HTML
这个视觉差幻灯片插件的html结构是使用一个容器div包含许多动画元素div da-slide。每一个动画元素div包含一个h2标题、一个用于描述的p元素、一个链接和一个包含图片的div。
<div id="da-slider" class="da-slider">
  <div class="da-slide">
    <h2>Some headline</h2>
    <p>Some description</p>
    <a href="http://www.htmleaf.com/" class="da-link">Read more</a>
    <div class="da-img">
      <img src="images/1.png" alt="image01" />
    </div>
  </div>
  <div class="da-slide">
    <!-- ... -->
  </div>
  <!-- ... -->
  <nav class="da-arrows">
    <span class="da-arrows-prev"></span>
    <span class="da-arrows-next"></span>
  </nav>
</div>
这个插件的核心是要使每一个元素都有动画效果。我们通过给每个元素一个“direction class”来控制它们的行为。例如:如果想控制当前元素向右运动,那么给它一个class da-slide-toright”,下面列出了4个方向的class:
- .da-slide-fromright
- .da-slide-fromleft
- .da-slide-toright
- .da-slide-toleft
上面给定的class通过css来控制它们的运动。
/* Slide in from the right*/
.da-slide-fromright h2{
  animation: fromRightAnim1 0.6s ease-in 0.8s both;
}
.da-slide-fromright p{
  animation: fromRightAnim2 0.6s ease-in 0.8s both;
}
.da-slide-fromright .da-link{
  animation: fromRightAnim3 0.4s ease-in 1.2s both;
}
.da-slide-fromright .da-img{
  animation: fromRightAnim4 0.6s ease-in 0.8s both;
}

/* Adjust animations for different behavior of each element: */
@keyframes fromRightAnim1{
  0%{ left: 110%; opacity: 0; }
  100%{ left: 10%; opacity: 1; }
}
@keyframes fromRightAnim2{
  0%{ left: 110%; opacity: 0; }
  100%{ left: 10%; opacity: 1; }
}
@keyframes fromRightAnim3{
  0%{ left: 110%; opacity: 0; }
  1%{ left: 10%; opacity: 0; }
  100%{ left: 10%; opacity: 1; }
}
@keyframes fromRightAnim4{
  0%{ left: 110%; opacity: 0; }
  100%{ left: 60%; opacity: 1; }
}
可用参数
下面是可用的参数选项:
$('#da-slider').cslider({
  current   : 0,
  // index of current slide
  bgincrement : 50,
  // increment the background position
  // (parallax effect) when sliding
  autoplay  : false,
  // slideshow on / off
  interval  : 4000
  // time between transitions
});